FAQ Suppliers
(Supplier) How to Create a Term Time template.
Dashboard >> Activities >> Term Templates >> Add New
What is a term?
A term is the period a term time activity takes place for example: Winter term.
A term can be any period of time that you choose.
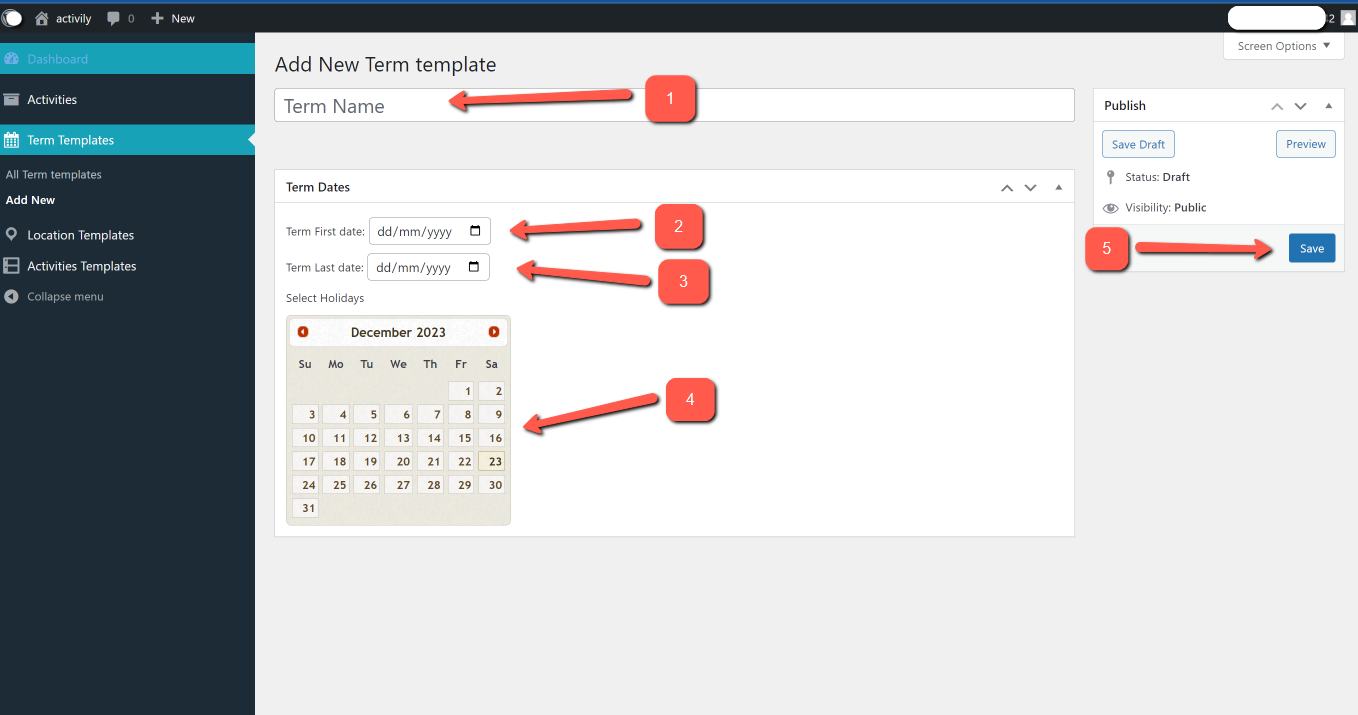
- Give your term a name that is easy for you to identify later. (Top Tip) You may prefer to add the start and end dates in the title for extra clarity. For example: Autumn term 01.09.24 to 20.10.24
- Select the opening date for the term
- Select the closing date for the term
- Select the dates that the activity will not take place. For example staff holidays, bank holidays etc.
- Click save
(Supplier) How to Create a Location Template.
Dashboard >> Activities >> Location Templates >> Add New
What is a location?
A location is where the activity will take place. You may have multiple locations for multiple activities or one location for all your activities. This is a great way to manage them all.
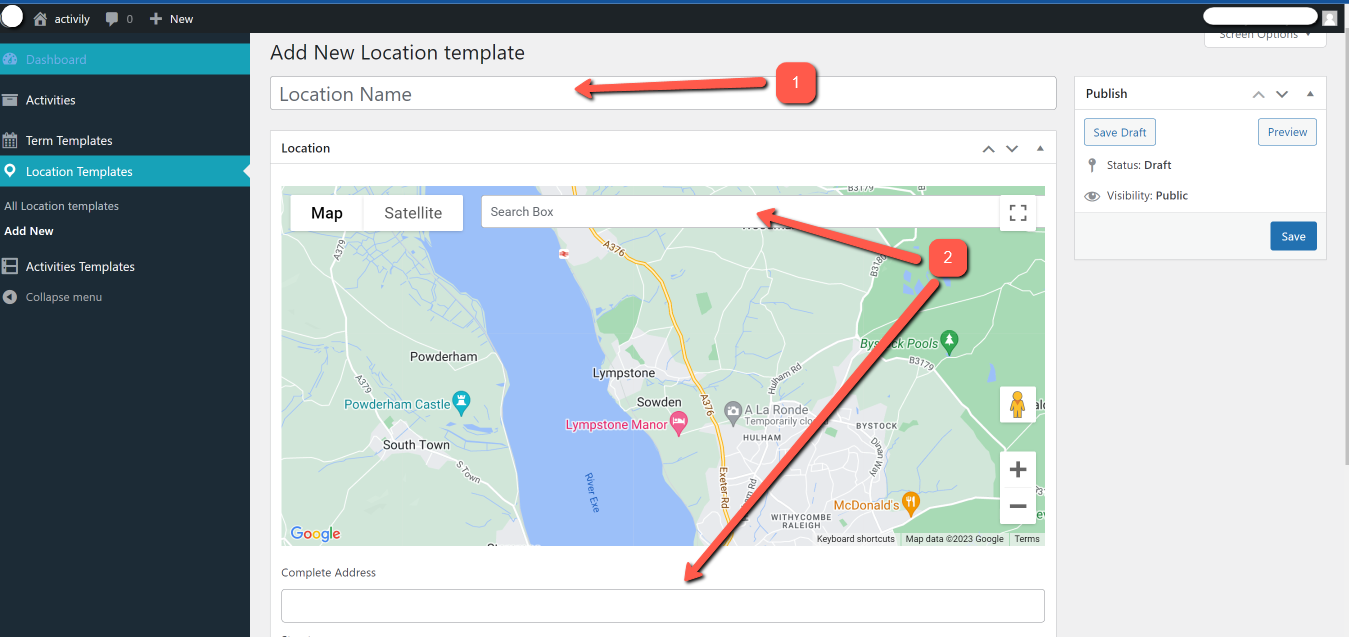
- Give your location a name that is easy for you to identify later.
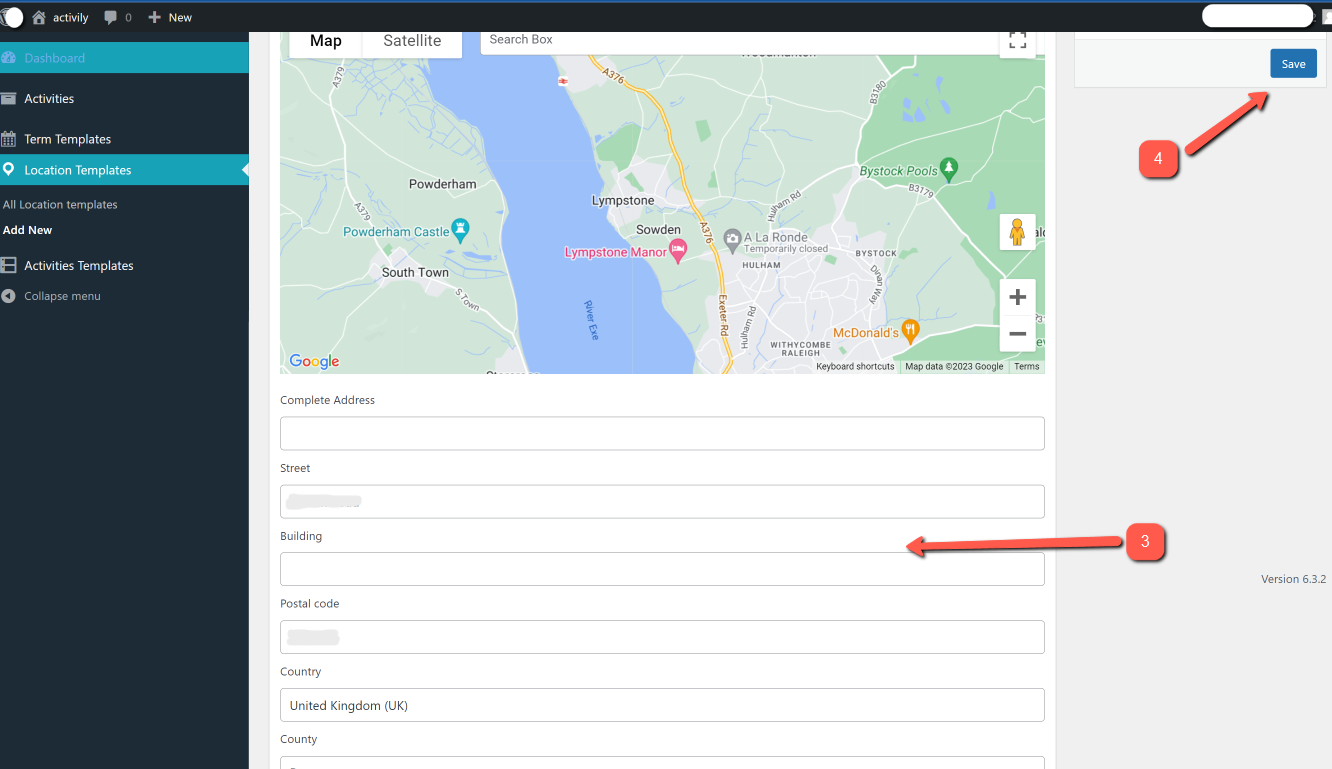
- In the Search box on the map, search for and select your location. This will then autofill the complete address field and the postcode.
- Complete the other sections as you require.
- Click save
(Supplier) How to Create an Activity Template.
Dashboard >> Activities >> Activity Templates >> Add New
What is an Activity?
An activity is the class, activity, club, camp etc that you provide to customers.
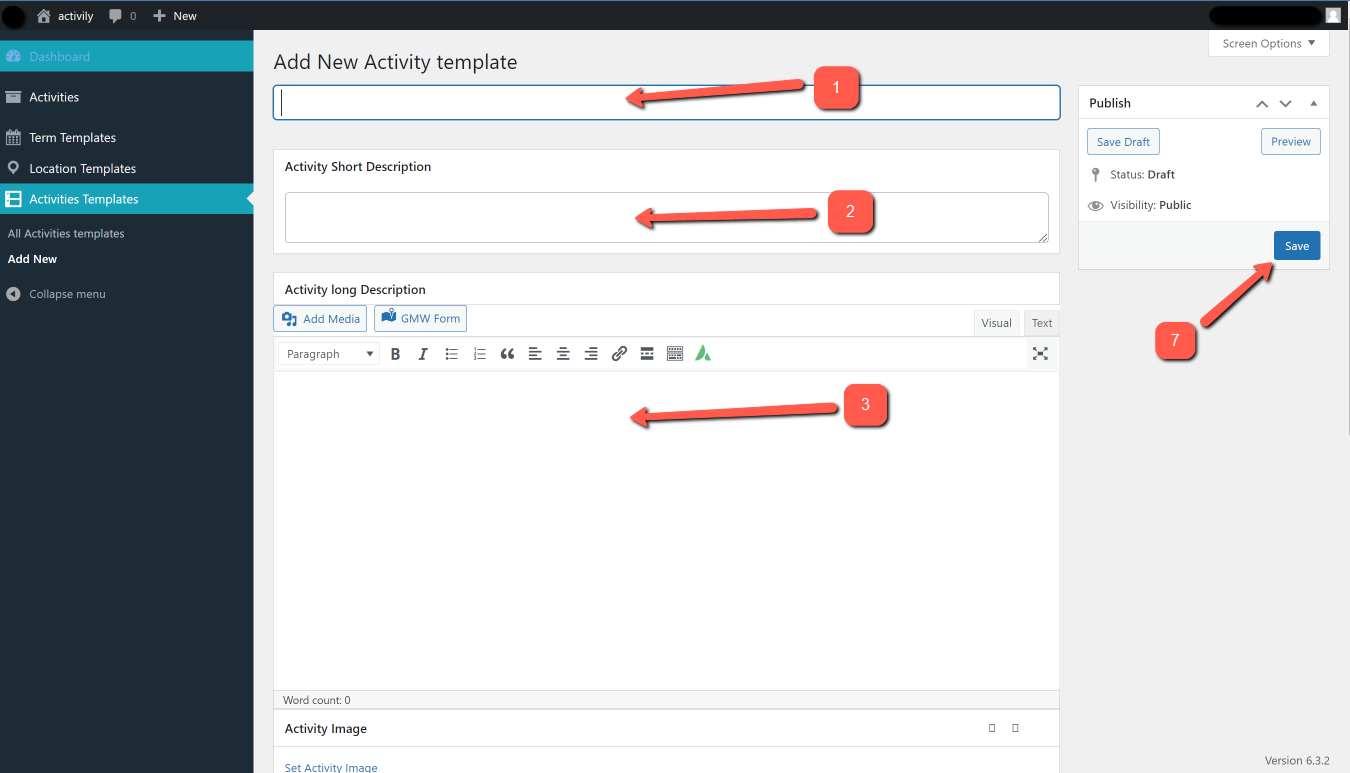
- Give your location a name that is easy for you to identify later. (Top Tip) Where you have the same activity but with different criteria for example age, price, accessibility etc, you may wish to add these unique identifiers so you can choose the correct activity template later.
- Add a short activity description (NOTE This will be visible to your customers), so you can be as creative as you like here
- Add an activity long description (NOTE This will be visible to your customers), so make sure you add all the details to help your prospective customer to make a well informed decision.
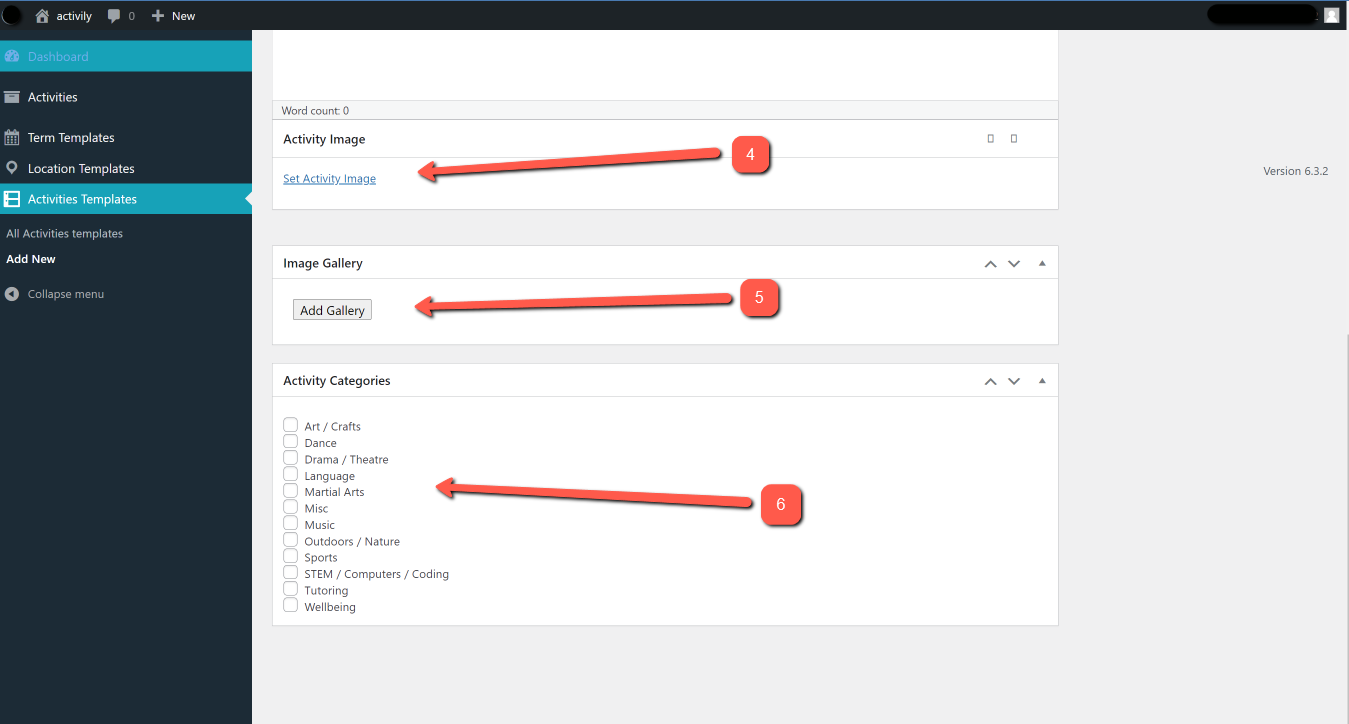
4. Add Activity image. For best results make sure to use high quality images of XXX x XXX pixel size
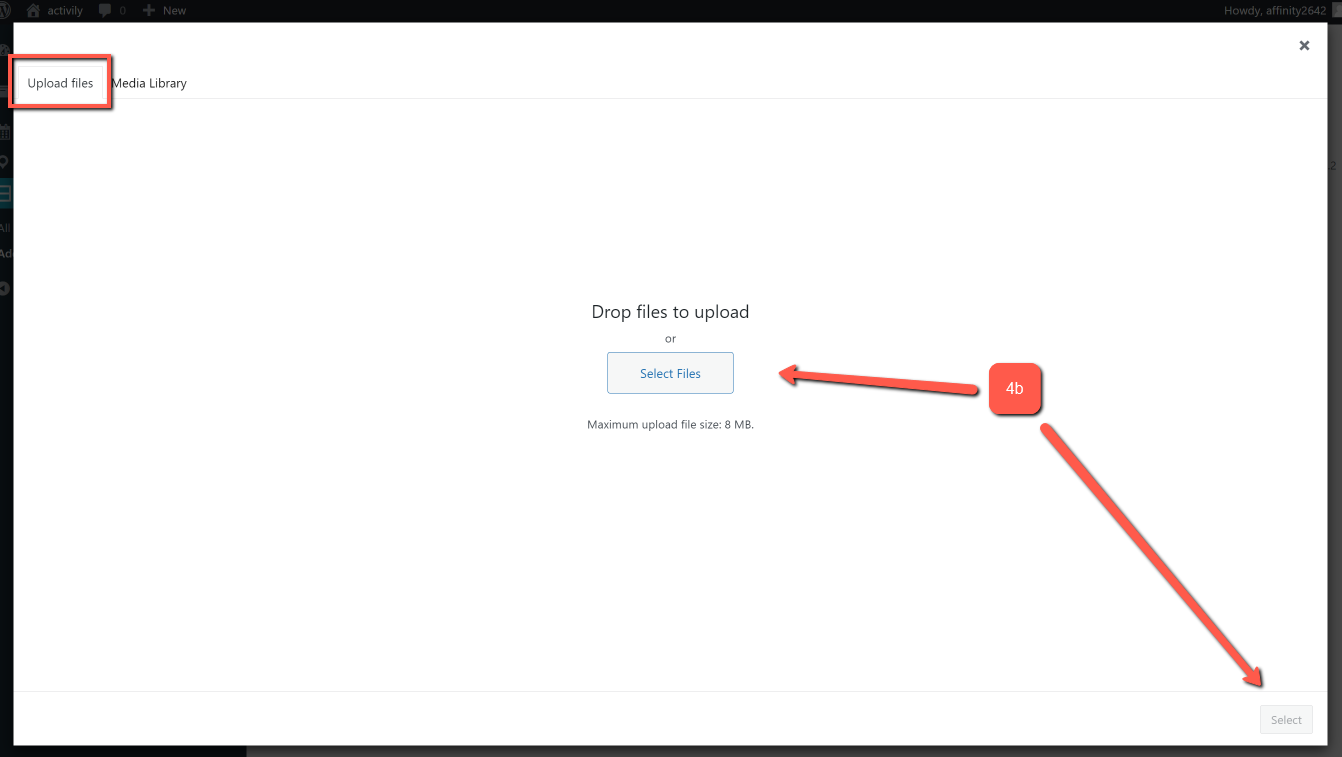
a. Click “set activity image
b. If it is your first time setting an activity image you will need to upload an image. To do this select the Upload Image tab, drag images or select from a file and upload.
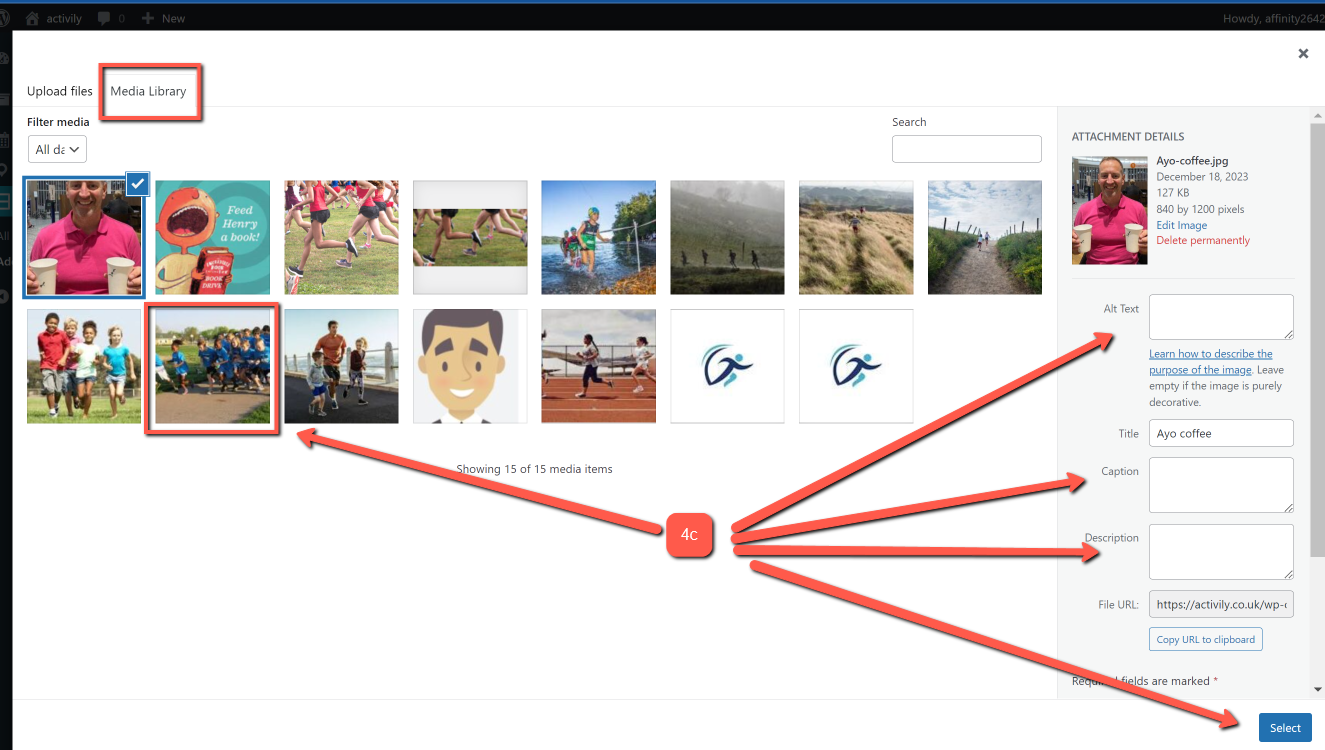
c. Select the Media Library tab, select the image you wish to set as the main image, add an image caption and description if you wish (on the left hand side of the screen - this is great for SEO)
5. Add any additional images you wish using the image gallery. NOTE you can add up to three further images.
6. Add Activity categories. You can add multiple if you wish. (Top Tip - Ensure you select categories that accurately describe your activity so customers can easily find and select your activity).
7. Click save.
(Supplier) How to Create a Term Time Activity Listing (Note this is only for Term Time Activities, not Holiday Camps)
Dashboard >> Activities >> Add New Term Time Activity
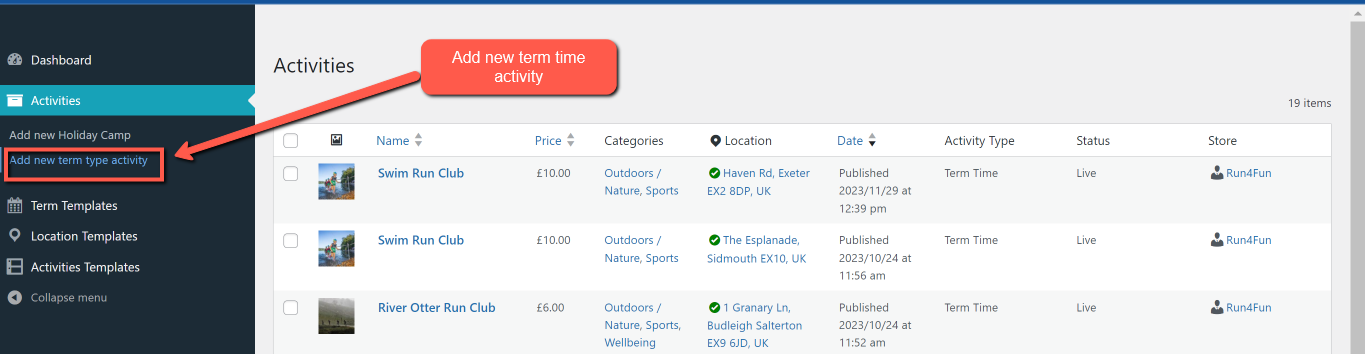
- Select Add New Term Time Activity
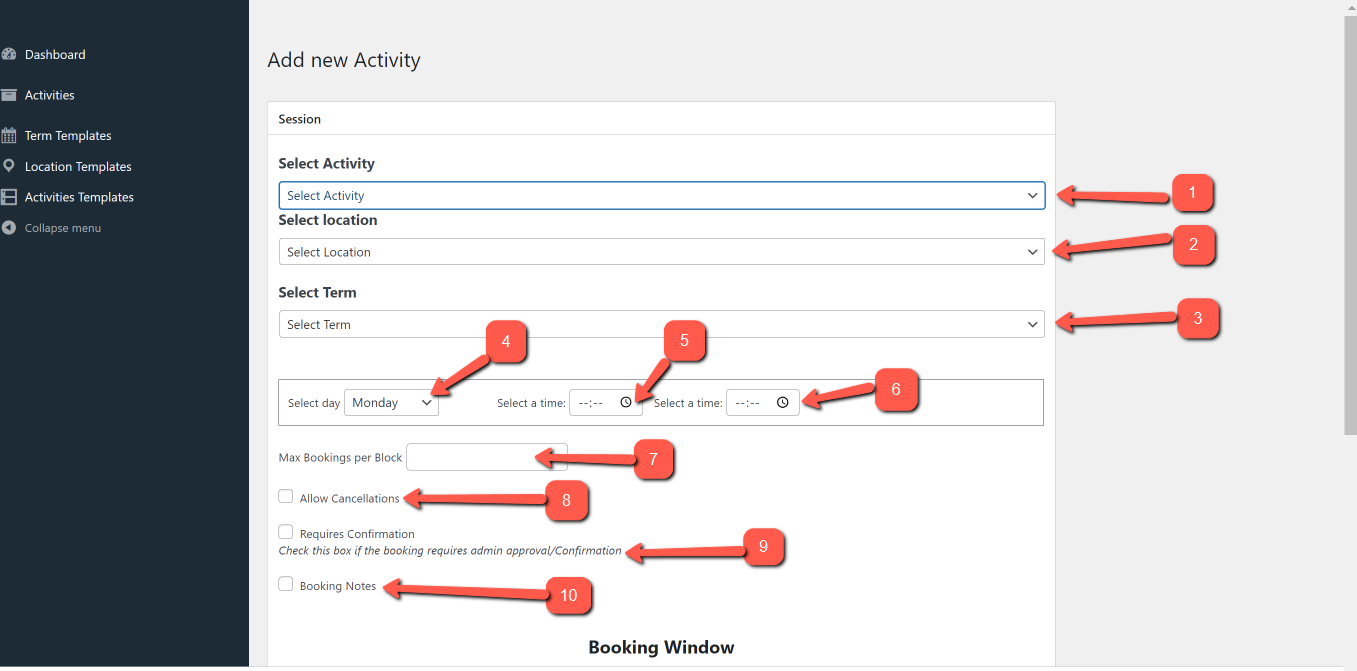
- From the drop down - Select Activity, choose the Activity from the templates you created earlier.
- From the drop down - Select Location, choose the Location from the templates you created earlier.
- From the drop down - Select Term, choose the Term from the templates you created earlier.
- Select the day of the week the activity takes place. (Note you can only select days that relate to this specific activity)
- Select start time and a finish time
- Enter the total number of spaces on the activity into the Max bookings per Block field
- You can select Allow cancellations to allow customers to cancel booking before the activity starts. You choose the time frame, (minutes, hours or days)
- If you select Requires Confirmation you will need to manually confirm the booking in your Dashboard in Notifications
- You can add Booking Notes These will be shown to the customer when they make their booking
Booking Window
The booking window is designed to give you control of when your bookings are available to the customer to book. For example, you may wish to list an activity months in advance to maximize your bookings or terminate a listing before displaying a new activity with a special promotion.
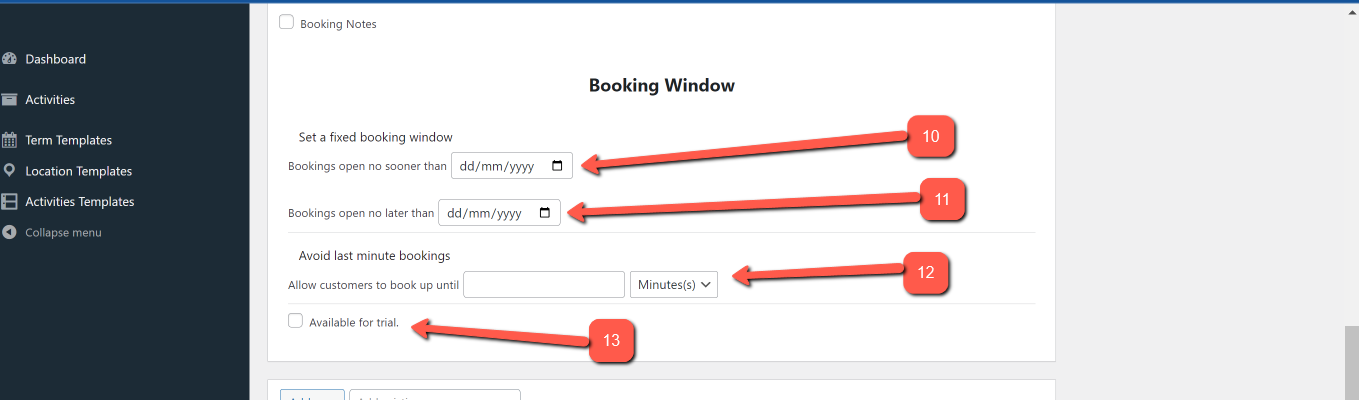
11. Set the date the activity is listed as live and visible to customers in the Bookings open no sooner than section.
12.Set the date the listing terminates in the Bookings open no later than section.
13. In the Avoid last minute bookings section, Allow customers to book up to a certain time/date using the Allow customers to book up until field, this avoids last minute bookings and helps with participant management.
14. You can allow new customers to book a trial session by ticking the Available for trial box.
Key Activity Criteria
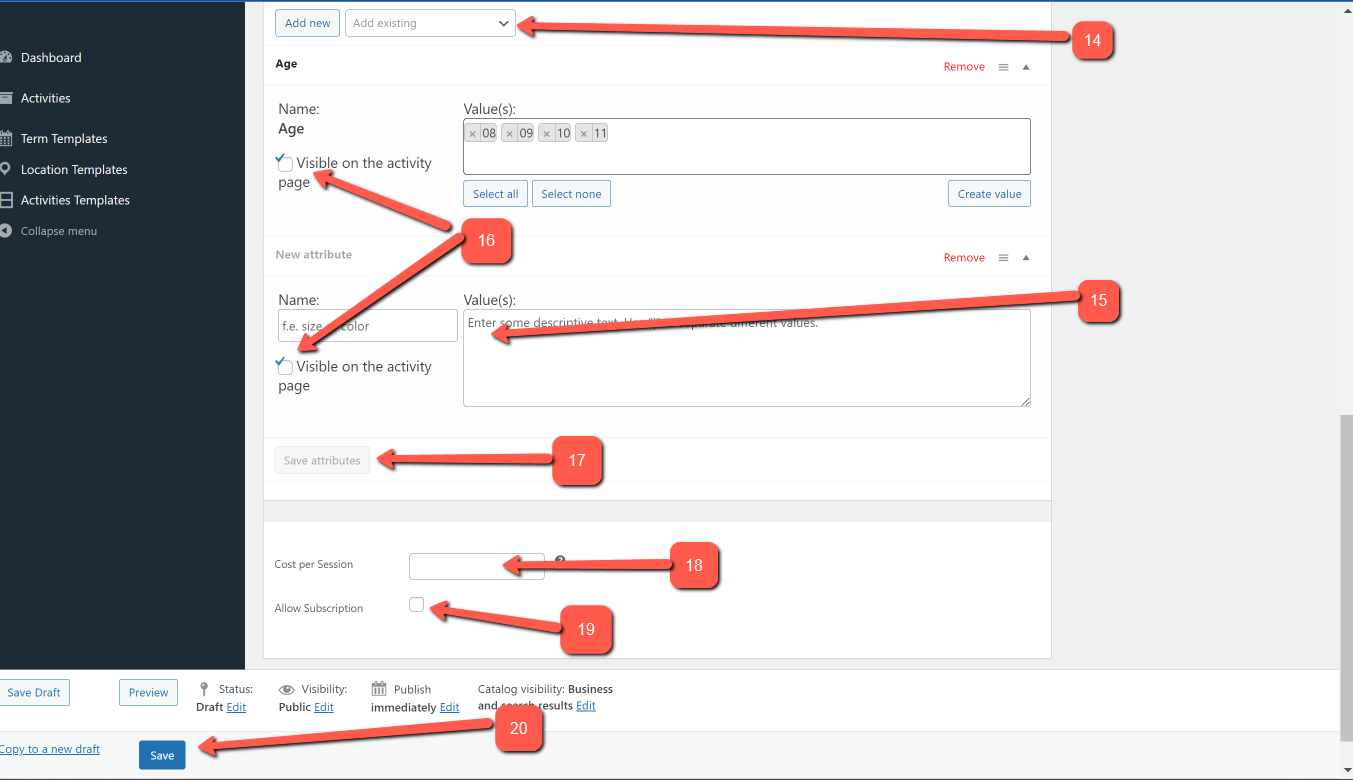
15. Set key attributes. These are searchable by the customer and include ages, types of activity and days of the week.
16. You can create additional attributes by clicking Add New, giving the attributes a name and then listing all the options that you wish to include in the attribute. For example, you could set an attribute called “Accessibility” and have various accessibility options like wheelchair access, lift access etc.
17. Tick the Visible on the activity page box to make the attribute visible and searchable.
18. Save attributes
19. Set the cost per session for your activity. (This is not the total cost. The system will calculate the number of sessions based on your term and day settings)
20. You can allow customers to pay per session by ticking the Allow Subscription” box. When a customer books using this option, they will be charged the first session upon booking and all further sessions 24 hours before the next activity takes place.
21. Click Save
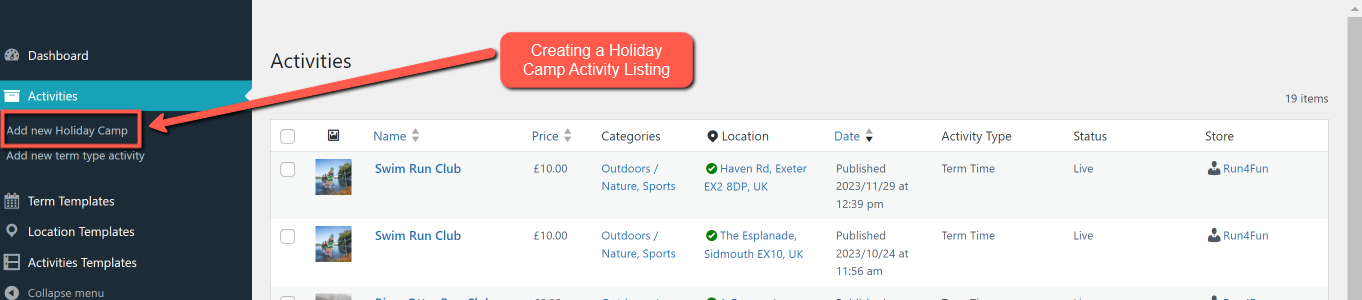
(Supplier) How to Create a Holiday Camp Activity Listing (Note this is only for School holiday Camp type activities, not Term Time Activities)
Dashboard >> Activities >> Add New Holiday Camp
Top Tip - Whilst the holiday camp section is designed for school holiday clubs and camps, there is no reason why this section could not be used to create single “one off” activities too.
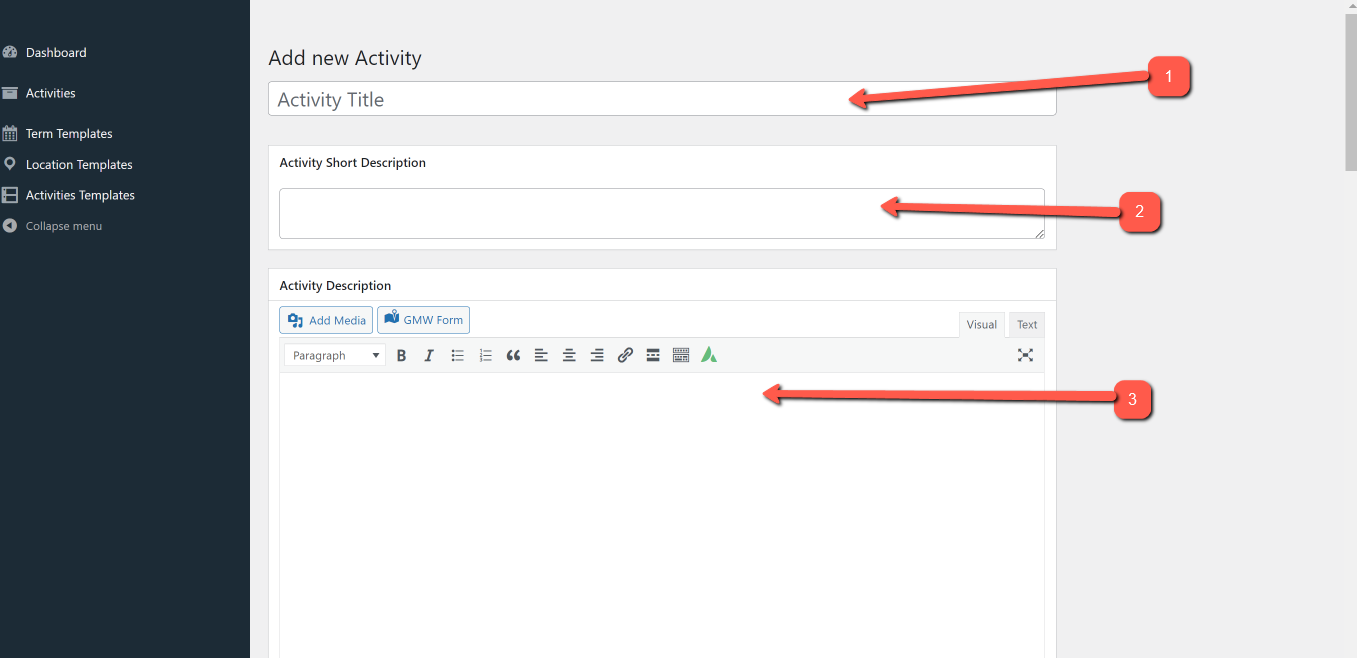
- Give your Holiday Camp activity a name that is easy for you to identify later. (Top Tip) Where you have the same activity but with different criteria for example age, price, accessibility etc, you may wish to add these unique identifiers so you can choose the correct activity template later.
- Add a short activity description (NOTE This will be visible to your customers), so you can be as creative as you like here
- Add an activity long description (NOTE This will be visible to your customers), so make sure you add all the details to help your prospective customer to make a well informed decision.
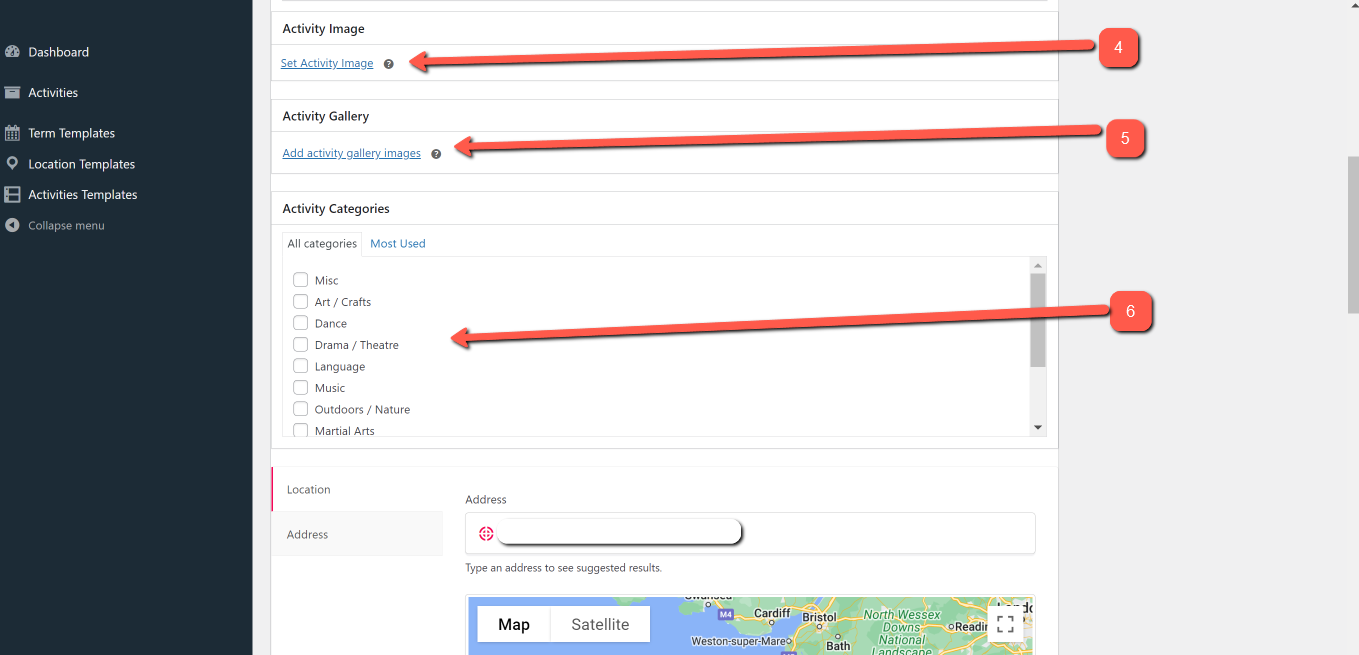
4. Add Activity image. For best results make sure to use high quality images of XXX x XXX pixel size
a. Click “set activity image
b. If it is your first time setting an activity image you will need to upload an image. To do this select the Upload Image tab, drag images or select from a file and upload.
c. Select the Media Library tab, select the image you wish to set as the main image, add an image caption and description if you wish (on the left hand side of the screen - this is great for SEO)
5. Add any additional images you wish using the image gallery. NOTE you can add up to three further images.
6. Add Activity categories. You can add multiple if you wish. (Top Tip - Ensure you select categories that accurately describe your activity so customers can easily find and select your activity).
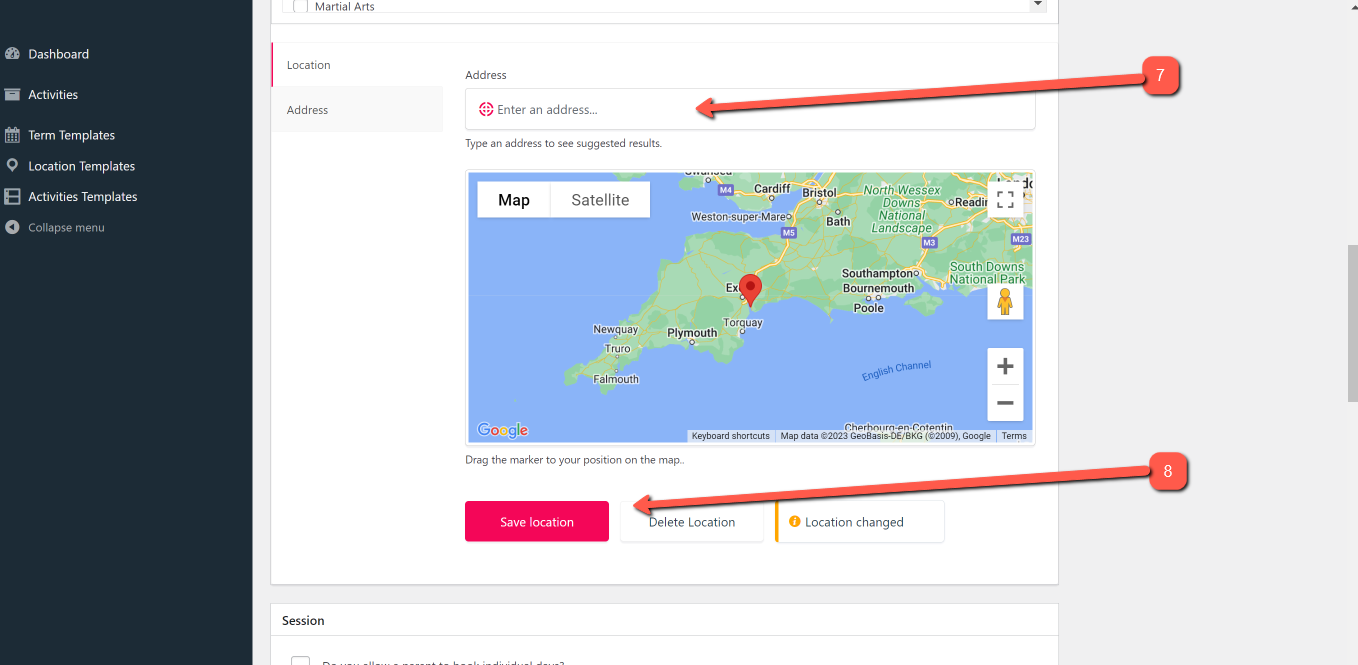
7. Add the activity venue address in the field above the map. Start typing the address and suggestions will start to appear, select the appropriate one and check the map displays the location correctly.
8. Save Location and the “Location Confirmed notification will show in green
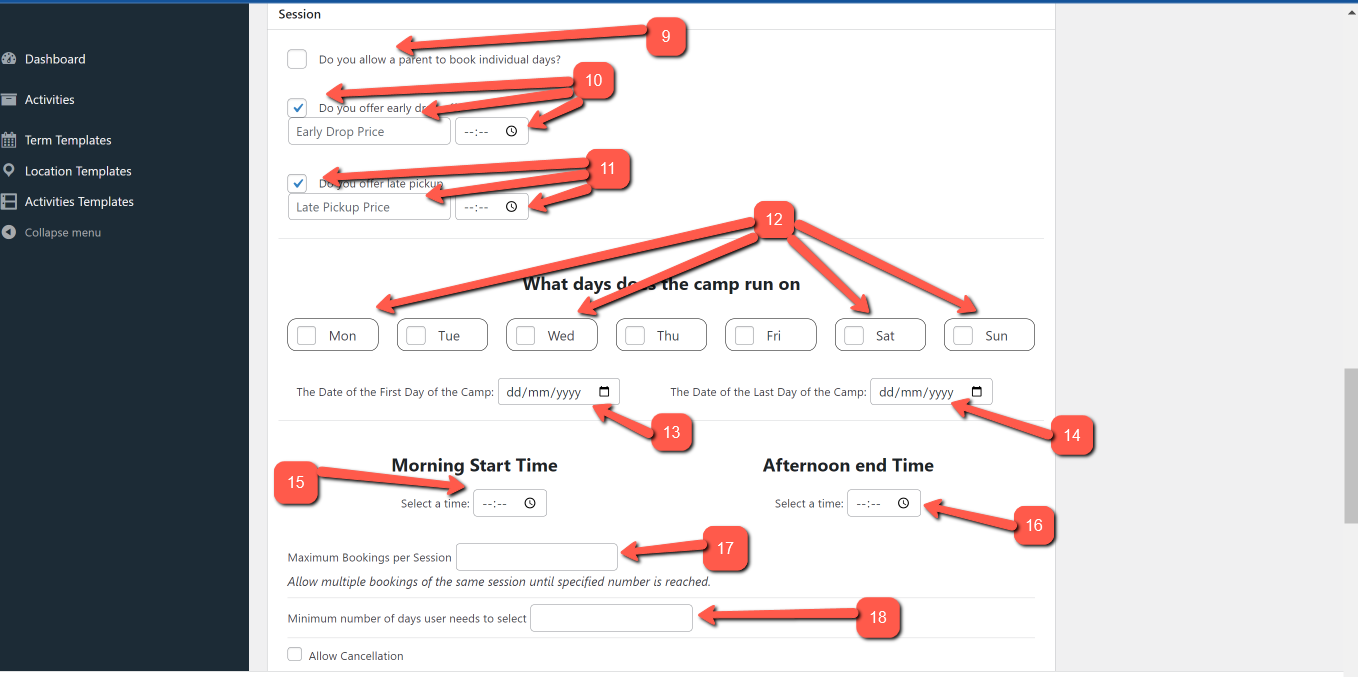
9.In the Sessions section, tick the box if you will letting customers book individual days.
10. Tick the early drop off box if you will provide customers with the ability to drop off participants earlier than the stated time of the activity. By selecting this you need to then add the early drop off time and any additional costs to the customer.
11. Tick the late pick box if you will provide customers with the ability to pick up participants later than the stated time the activity finishes. By selecting this you need to then add the late pick up time and any additional costs to the customer.
12. Select which days the Holiday camp will run
13. Select the first date the camp will run
14. Select the last date the camp will run
15. Select the Morning Time as the start time
16. Select the Afternoon end time as the end time (it doesn’t need to be in the afternoon)
17. Enter the total number of spaces on the activity into the Max bookings per Block field
18. Set the criteria for the Minimum number of days user needs to select (so if you allow customers to book single sessions (1 day) you would select 1 in this field)

19. You can select Allow cancellations to allow customers to cancel booking before the activity starts. You choose the time frame, (minutes, hours or days)
20. If you select Requires Confirmation you will need to manually confirm the booking in your Dashboard in Notifications
21. You can add Booking Notes These will be shown to the customer when they make their booking
Booking Window
The booking window is designed to give you control of when your bookings are available to the customer to book. For example, you may wish to list an activity months in advance to maximize your bookings or terminate a listing before displaying a new activity with a special promotion.
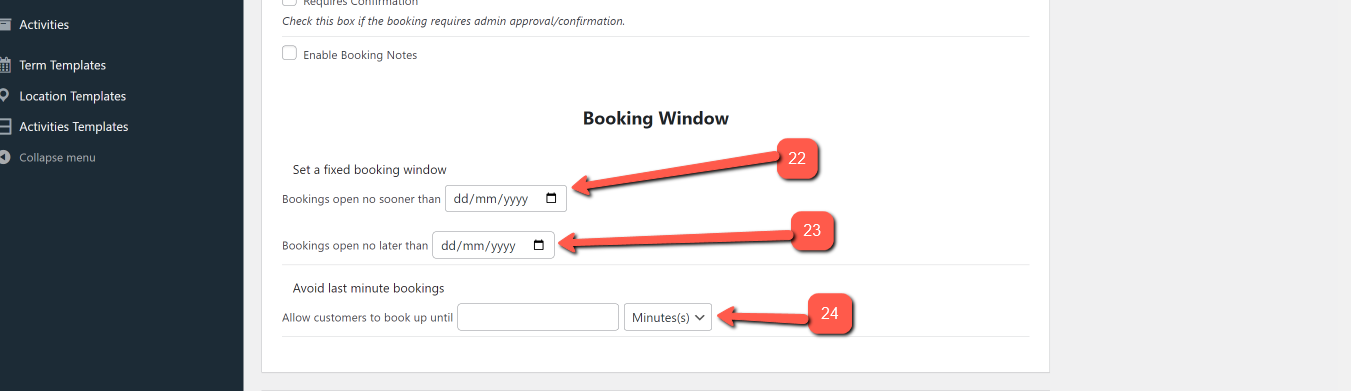
22. Set the date the activity is listed as live and visible to customers in the Bookings open no sooner than section.
23. Set the date the listing terminates in the Bookings open no later than section.
24. In the Avoid last minute bookings section, Allow customers to book up to a certain time/date using the Allow customers to book up until field, this avoids last minute bookings and helps with participant management.
Key Activity Criteria
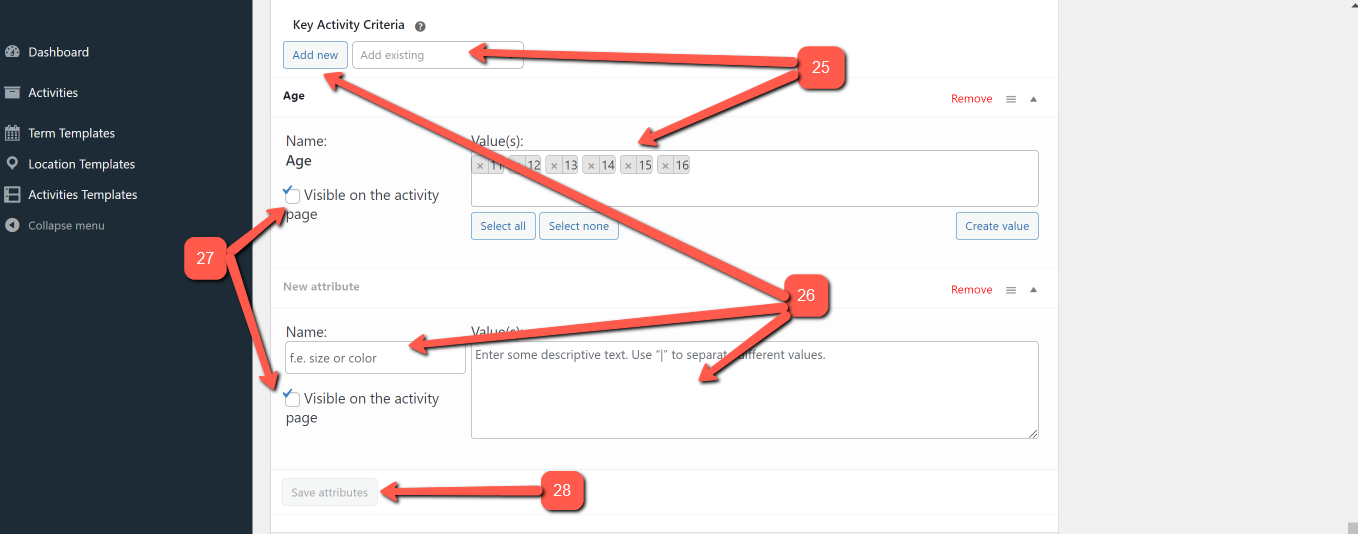
25. Set key attributes. These are searchable by the customer and include ages, types of activity and days of the week.
26. You can create additional attributes by clicking Add New, giving the attributes a name and then listing all the options that you wish to include in the attribute. For example, you could set an attribute called “Accessibility” and have various accessibility options like wheelchair access, lift access etc.
27. Tick the Visible on the activity page box to make the attribute visible and searchable.
28. Save attributes
Pricing
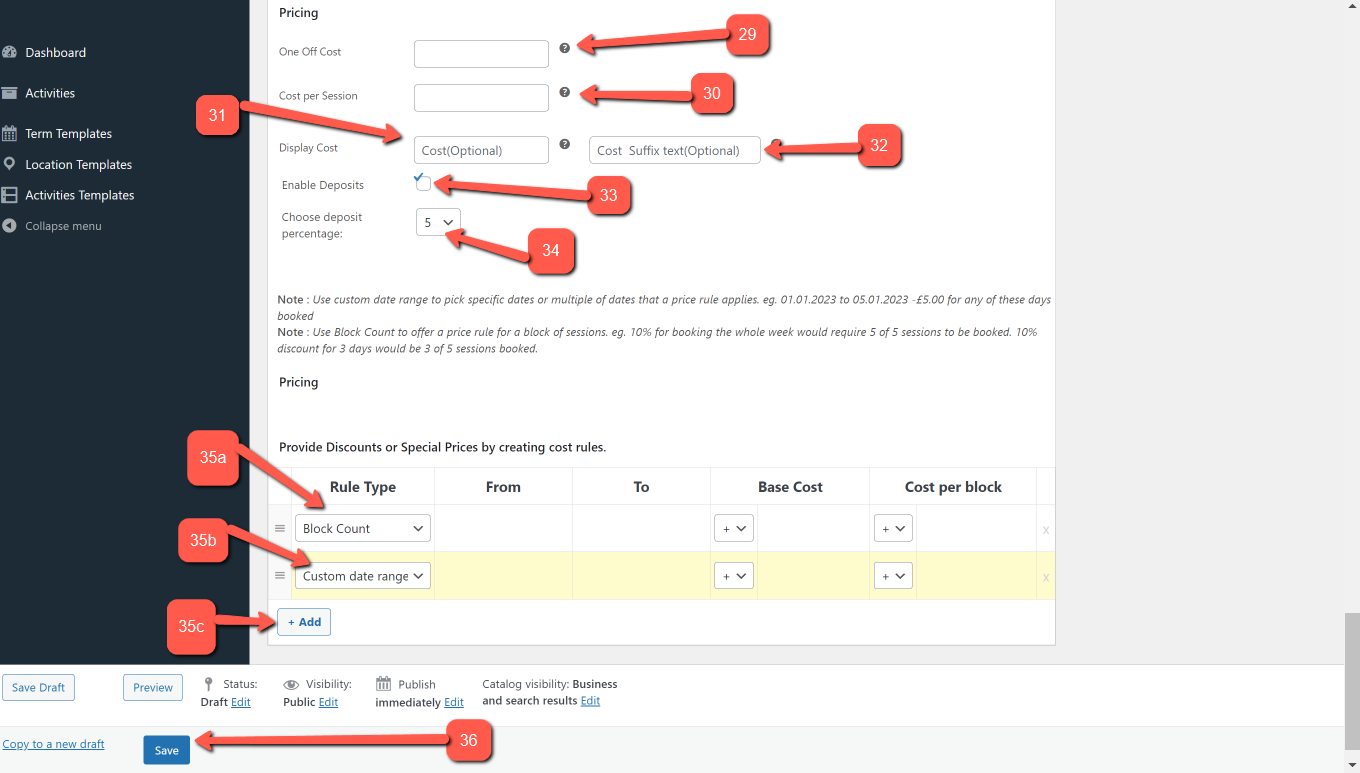
29. (If required you can create a One off Cost if you require customers to pay for something like admin or insurance or other single costs on top of the activity cost
30. In the Cost per Session field add the full price customers will pay. (You can create rules for discounts and special offers later)
31. The Display Cost field is what the customer will see. (This can be left blank if the details are the same as the Cost per Session field.
32. You can add Cost suffix text as additional information to the displayed price. For example: “Book 3 days for a 10% discount”
33. Tick the Enable Deposits box to offer customers to pay a deposit with the remainder due 24 hours before the activity takes place.
34. Set the deposit percentage you wish the customer to pay to secure their booking (if you have enabled deposits).
35. In the section: Provide Discounts or Special Prices by creating cost rules you can set special pricing rules.
a. Use Block Count to offer a price rule for a block of sessions. eg. 10% for booking the whole week would require 5 of 5 sessions to be booked. 10% discount for 3 days would be 3 of 5 sessions booked.
b. Use custom date range \ Range of months \ Range of days \ to pick specific dates or multiples of dates that a price rule applies. eg. 01.01.2024 to 05.01.2024 -£5.00 for any of these days booked
c. Use the +Add button to set multiple pricing rules
36. Click Save